Thursday, August 19, 2010

Exchange 2007: Understanding the Routing Group Connector between an Exchange 2003 and Exchange 2007 Messaging Environment

In a previous Blog entry I outlined the steps necessary to install the first Exchange 2007 Server into an existing Exchange 2003 Messaging Environment.  This process, which Microsoft terms a 'Transition Strategy' is well defined and well documented.  As part of a deeper look into the Routing Group Connector I thought I would offer some details using both the Exchange Management Shell (Powershell) and the Exchange Management Console to detail settings.  Additionally, I show how to use the Message Tracking Application from the Exchange 2007 Manager Console.
Here are the reference URLs to prior Blog entries of interest on this topic:
In this Blog entry I will analyze mailflow across the Routing Group Connector to provide a clearer picture of what occurs while Organizations are Transitioning from Exchange 2003 to Exchange 2007.

 
1.  Let's begin by examining the 2 Servers that comprise the Exchange 2003 Site titled 'First Administrative Group', and, the 2 Servers in the Exchange 2007 Site titled 'Exchange Administrative Group'.  We see 4 Servers total:
Exchange 2003
  1. S01-EX00
  2. S01-EX00-1
Exchange 2007
  1. S01-EX01
  2. S01-Ex02


2.  The Exchange 2007 Servers have been introduced into the Exchange 2003 Organization named 'ITPS Lab Exchange Organization'.  When this occurred, a Bi-Directional Routing Group Connector was generated as part of the installation process.  We see here the Routing Group Connector titled 'ITPS Lab Interop RGC' (actually, this is a hand-generated Routing Group Connector I created 'after the fact').  In this example, the Exchange 2007 Installation Process generated the RGC, then I generated an additional RGC and finally, deleted the RGC created automatically by the Exchange 2007 Installation Process.  In a typical environment, we would generate (with the Exchange 2007 Installation Process) and maintain a single Routing Group Connector (RGC).  Unless of course multiple Exchange 2007 Hub Transport Role Servers are required.


3.  Let's examine the Properties of the Exchange 2003 Routing Group Connector.


4.  Here we see the Exchange 2003 Server (titled S01-EX00) is the Default Server used for Routing Messages over the Routing Group Connector to the Exchange 2007 Remote Bridghead Servers.


5.  The Exchange 2007 Server that is the Remote Bridgehead Server for this Exchange 2003 Routing Group Connector is titled 'S01-EX01'.  It is an Exchange 2007 Hub Transport Role Server running Exchange 2007.


6.  Now, let's examine the Routing Group Connector Properties for the Exchange 2007 Routing Group.  Remember, Exchange 2007 only uses Routing Group Connectors for interoperability 'backwards' to Exchange 2003 Organizations.


7. Again, we see reciprocity! The Exchange 2007 Hub Transport Role Server (titled 'S01-EX001') 'connects' over this Routing Group Connector to the Exchange 2003 Server (titled in the next caption as 'S01-EX00').


8.  The Remote Bridgehead Server for the Exchange 2003 Routing Group is identified as 'S01-EX00'.


9.  Next I move to the Exchange 2007 Hub Transport Role Server titled 'S01-EX01'.  As you can see, through the Exchange Management Console there is no Graphical Interface for Administering a Routing Group Connector (RGC).  We will instead use the Exchange Management Shell to invoke the 'Get-RoutingGroupConnector' Commandlet.


10.  Initially, when I offer the Exchange Management Shell Commandlet 'Get-RoutingGroupConnector' we see data listed in a Table from the default feedback.  Here's the Exchange Management Shell Commandlet:
get-routinggroupconnector


11.  Next, to see the full detail for this EMS Commandlet I issue the following Commandlet using the 'Pipeline Parameter' (|) followed by 'Format List' (fl):
get-routinggroupconnector | fl


12.  The second half of the EMS window appears here.  Notice we have rich granularity in the Attributes available.


13.  So, what do we have here?  This is another variation of the EMS Commandlet denoting additionall Attributes be displayed.  Here we can see both 'Source Transport Server' and 'Target Transport Server' by using the followng EMS Commandlet variation:
get-routinggroupconnector |fl targetroutinggroup,targettransportservers,sourcetransportservers


14.  Next I add the 'Cost' Attribute to display in this EMS Commandlet.  Here's the Commandlet syntax:
get-routinggroupconnector |fl targetroutinggroup,targettransportservers,sourcetransportservers,cost

15.  Finally, I personally favor the following EMS Commandlet Syntax for this Commandlet.  It allows me to keep track of versional changes.
get-routinggroupconnector |fl targetroutinggroup,targettransportservers,sourcetransportservers,cost,whencreated,whenchanged

16.  Okay, so where are we?  We just spent time using the Exchange Management Shell (EMS) to analyze the output of the Routing Group Connector that links the Legacy Exchange 2003 Organization to the initial Exchange 2007 Hub Transport Role Server in our Messaging Environment.  We are reviewing these configuration details to understand how and where SMTP Messages 'Route' in a Transitional Strategy that involves Exchange 2003 and Exchange 2007.


17.  Next, I would like to review the 'Routing Log Viewer' available from within the Exchange Management Console in Exchange 2007.  You will find it on the 'Tools' leaf of the Exchange 2007 Management Console.


18.  The 'Routing Log Viewer' in the Exchange 2007 Management Console (EMC) provide XML Files that 'record' the Routing Configuratin across all Routing Group Connectors, Send Connectors and Receive Connectors.  Foreign Connectors are not included in the Routing Log Viewer as Foreign Connectors simply 'pickup' SMTP Messages from the 'Pickup' Directory. 


19. I select the most recent XML File to examine the contents.


20.  Most Exchange System Engineer's have never seen, nor used the Routing Log Viewer.  Here we can see the Active Directory Site whereby the Exchange 2007 Servers are visible.  And, the Exchange 2003 Routing Group where the Exchange 2003 Servers are visible.


21.  Upon moving to the 'Servers' Tab in the Routing Log Viewer we see a more detailed breakdown of both Exchange 2003 and Exchange 2007 Servers.  Note the Exchange 2007 Servers use the Active Diretory Sites as their respective 'Routing Boundaries' (lower portion of capture) while the Exchange 2003 Servers use the Routing Group as their respective 'Routing Boundaries'.


22.  Next we observe the 'Send Connectors' Tab of the Routing Log Viewer.  Some of the details of the Routing Group Connector are present in this Graphical Interface. 


23.  As part of the endeavor to understand SMTP Message Routing across a Routing Group Connector I would like to 'follow' a message from an Exchange 2007 User Mailbox, across the Routing Group Connector to an Exchange 2003 User Mailbox.  We can use Message Tracking available in the Exchange 2003 System Manager (ESM) and in the Exchange 2007 Management Console (EMC).  Here I begin logging in as an Exchange 2007 Mailbox User fictitiously named 'Steve Railson' to send e-mail to an Exchange 2003 Mailbox User named 'Field1'.


24.  Logging in to prepare e-mail for an Exchange 2003 Target (from an Exchange 2007 Mailbox User).


25.  E-mail prepared and sent.  This message should 'travel across' the Exchange 2007 Hub Transport Role Server to the Routing Group Connector (RGC), ultimately to the Exchange 2003 Routing Group Server and finally to the destination Exchange 2003 User Mailbox Server.  Let's follow it's path!


26.  Confirmation of the 'CC' of this message from/to himself.


27.  I move to the Exchange 2003 Mailbox Server Role titled 'S01-EX00-1' to confirm an Exchange 2003 Mailbox User named 'Field1'.  Confirmation complete!  Our Mailbox is on this server!


28.  When I open the 'Messaging Tracking Center' in Exchange 2003 and input query parameters (like Exchange 2007 Mailbox User Name, Mailbox Server Name, etc.) the response is identification of the exact message sent.  Next, let's look a the Message Tracking in the Exchange 2007 Messaging Tracking to determine how this SMTP Message 'travelled' using which Connector (it should be our Routing Group Connector!).


29.  I move to the EMC on an Exchange 2007 Hub Transport Role Server.  Next, I open the Message Tracking Application.


30.  When I input a narrow time range (the exact 5 minute interval I know the message was sent) I receive a response with the exact message tracking detail.  Now, here is our point of confirmation - will the SMTP Message from the Exchange 2007 Mailbox User (srailson User ID) transmit over the Routing Group Connector as we expect?  Let's see.


31.  Yes!  Success!  A closer examination of the 'ConnectorID' Attribute and we see 'Intra-Organization SMTP Send Connector' indicated as the Connector used to transmit this SMTP Message from the Exchange 2007 Hub Transport Role to the Exchange 2003 Routing Group Server.  Thus providing 'mailflow' between a Legacy Exchange 2003 Organization and new Exchange 2007 Hub Transport Role Servers in the same Exchange Organization.

In this Blog entry I review many of the configuration parameters of an Exchange 2007 Routing Group Connector.  I use the many of the Exchange 2007 Applications for analysi, including the Exchange Management Shell Commandlet 'get-routinggroupconnector', the Exchange Management Console, the Routing Log Viewer and Message Tracking.  While, when working on the Exchange 2003 Server Role I use the Exchange System Manager and the Message Tracking Center.  All of these Tools prove useful when determining the SMTP Message Routing in a joint Exchange 2003 and Exchange 2007 Messaging Infrastructure!

Wednesday, August 4, 2010

Demystifying the Active Directory FSMO Roles

If you've spent any time administering Active Directory, you've probably come across the concept of Flexible Single Master Operations (FSMO) roles. Their introduction is arguably one of the most important but misunderstood changes to Active Directory in the last ten years.

Take a trip down memory lane

In the days of Windows NT, one may recall the Primary Domain Controller (PDC) and Backup Domain Controller (BDC) concept. The directory was structured such that every DC, whether a PDC or a BDC, had a copy of the directory database, but only the PDC could make changes to that database. The model was inefficient, negatively impacted growth and desperately needed improving if the product had any chance of surviving.

Enter Windows 2000. The Directory Service went through one of its largest scale rebuilds to date. Replication and management was significantly improved and the concept of having a multi-master directory was introduced. Although this design has been tweaked over the years, fundamentally, it has remained the same through the versions - because it works. Any DC anywhere in the domain can execute virtually any update to the directory. This scales beautifully, even on large, geographically dispersed networks with many thousands of users.

However, notice I said virtually any change. Since a change can take effect at any DC, there is the possibility that a conflicting change will be made in two locations concurrently - or before replication can occur. Active Directory must ensure these situations are accounted for. In most cases, it applies its complex Multimaster Conflict Resolution Policy, which essentially says the last change wins. However, there are several procedures which simply cannot conflict; these procedures are assigned to one of the five FSMO roles, which go on to be delegated to one or more Domain Controllers.

What are the FSMO roles?

There are nominally five roles present in the directory which reside on DCs nominated specifically by the Administrator to perform these tasks. All the roles are very important and constitute a single point of failure in all Active Directory enterprises. If you have a complex topology with more than one domain, some roles are domain-specific, so you can expect to have duplicates of some roles in every domain in the enterprise.

  • The Domain Naming Master exists once per forest - in the forest root domain - and is rarely used. It is responsible for making changes to the Partitions container in the Configuration naming context at the root of the forest (CN=Partitions,CN=Configuration,DC=company,DC=com). The aforementioned path is the location of the objects used to identify child domains, application partitions and external cross-references (links out to other LDAP directories). Edits are strictly controlled and limited by FSMO role placement to one DC to ensure no objects of this type are duplicated with the same name.

    For example, when using the Domain Controller Promotion tool (dcpromo.exe) to create a new child domain or domain tree, the process will contact the Domain Naming Master role holder in the forest root domain to determine whether the domain name provided is unique. Similarly, if demoting the last domain controller in a child domain, the Domain Naming Master will again be contacted to clean the metadata from Active Directory.


  • Infrastructure Master:If a user from a foreign domain within the same forest is added as a member of a compatible group in another domain, the DCs in the group’s domain must have some information about that user in its local database in order to update the member attribute of the group. To do this, it adds a special record to its database called a phantom, which contains only the foreign user’s security identifier (SID), globally unique identifier (GUID) and their distinguished name (DN). Like all objects in the database, this record is given a distinguished name tag, or DNT, an internal reference used solely in the low-level Active Directory database layer. In doing this, the directory service is able to add that user as a member of the group by referring to the phantom’s DNT, just like it would refer to a user’s own DNT if you added a user from the group’s own domain to the group.

    That’s very clever, but what if something about the source user in their original domain changes? If the user is renamed, moved or deleted, the phantom in the group domain DC databases would lose its referential integrity with the source domain. This is a situation the infrastructure master aims to avoid. On a periodic basis (by default, every 2 days), the infrastructure master – an FSMO role present in every domain – compares its local database to a Global Catalog (GC) server to determine whether any changes have been made to the objects the phantoms were created to represent. A GC contains a partial replica of all objects in the forest, so replication means any GC would already know about this updated data. The phantom is then updated with new values or deleted from the domain’s database if the object has been removed from its source domain.

    In a multi-domain forest, you must either locate this role on a Domain Controller which is not a Global Catalog or, if you must locate the role on a GC, ensure all DCs in that particular domain are GCs. A GC will never create phantoms because it already knows about users from other domains. If the infrastructure master is a GC, there will never be any phantoms in its local database to compare with the global catalog data, so no updates will be made, but other non-GC DCs in the domain would gradually become outdated. If all DCs in the domain are GCs, or you only have a single-domain forest, every DC knows enough about the security principal that it does not need to create a phantom, so this role is essentially redundant.


  • Schema Master: As the name suggests, this role is the Master of the Schema, the information which contains the formal definitions of how Active Directory stores objects, what attributes are available on those objects and so on. This role exists once per forest, on a DC in the forest root domain. Any updates to the Schema must be tightly controlled, so one DC delegated as the Schema Master performs all such changes to the database. Schema updates are then replicated to other DCs on the network by standard Active Directory replication.


So far, three of the five roles have been covered. Those above are those I would consider the least critical FSMO roles in the forest. If you lose the DC delegated one or more of these roles, it's no big deal -- it may prevent a network administrator taking an action, but it will not impact the usability of the network. Losing the Domain Naming Master or Schema Master would create problems in regard to creating child domains or running schema updates, but these generally occur very rarely and checking this Operations master DC is up would be part of the planned engineering works. Similarly, losing the Infrastructure Master may cause integrity issues in the database, but given that it only runs its scan every two days in the first place, a day or two of outage will not generally cause an issue.

  • RID Master: This role is one of the two which are important to the daily operation of Active Directory. Under the glossy GUI of Windows, security principals are identified and differentiated by use of two values - a Security Identifier (SID) and a Globally Unique Identifier (GUID).

    A SID is an alphanumeric string which is unique throughout a forest. The SID is the actual value used internally by Windows to identify users and grant access to resources using Discretionary Access Control Lists (DACLs), for example, via the 'Security' tab on a file or directory. Have you ever deleted a user, recreated her, then wondered why she cannot access the same files and folders, despite having the same username? The new account would have a new SID and is therefore considered an entirely different security principal to the system.

    Contrary to popular belief, the username, distinguished name or full name of a user are not internal tracking mechanisms within Windows as all these values could change.

    The standard make up of an SID might be as follows (this SID is purely random):

    1:
    S-1-5-21-789336058-1123561945-725345543-10823


    The nature and formation of an SID is beyond the scope of this article, but it is the very last octet (in this instance, 10823) we are interested in. This figure represents a Relative Identifier (RID), an incremental value which actually makes the SIDs unique within a domain, ensuring no two users conflict in the database. When a security principal (user, computer, group etc.) is created, the domain SID (in this instance S-1-5-21-789336058-1123561945-725345543) has the next available RID appended to the end.

    Each Domain Controller is initially allocated a pool of 500 RIDs. As security principals are created, RIDs are used up. The allocation of RIDs to DCs is a task delegated in the RID Master FSMO role to one DC in a domain. Placing the operation in an FSMO role ensures no DC obtains a duplicate RID pool, which would eventually lead to conflicts in SID values and a major problem in terms of SID-uniqueness within the domain.


  • PDC Emulator is the most complicated and least understood role, for it runs a diverse range of critical tasks. It is a domain-specific role, so exists in the forest root domain and every child domain. Its original conception was for backwards compatibility with legacy systems, such as Windows NT BDCs. However, the role is also responsible for keeping the domain time in sync, given that the DC holding this role in the forest root domain is the most authoritative time source in the forest. Password changes and account lockouts are immediately processed at the PDC Emulator for a domain, to ensure such changes do not prevent a user logging on as a result of multi-master replication delays, such as across Active Directory sites.

    It should be noted that the PDC Emulator does not act in the same fashion as a PDC on a Windows NT network. Cast your eye back to the top of this article and note the section regarding a multi-master directory -- for multi-master aware applications, most updates can be made at any DC on the network. However, if an application (or Operating System) is not multi-master aware, the PDC Emulator acts as if it were the PDC on the Windows NT network. One of these older applications would most probably single out the PDC Emulator and write all its changes there.


The latter two roles are much more crucial to the daily operation of the network and could very quickly become a limiting factor in its growth, usability or even the logon process if the DC(s) holding the roles are offline for any period of time. If the RID Master is lost, impact will only be felt by the Network Administrator if a DC depletes its pool of RIDs. On busy networks, this could potentially occur in a matter of days through the creation of new security principals. However, loss of the PDC Emulator could directly affect your users -- you'd better have a substantial help desk ready for a spike in call volume if this DC is down for an extended period of time. For example, with the most authoritative source of time unavailable, time skew could eventually occur between DCs and computers in the enterprise and/or domain, lending itself to Kerberos authentication errors and ultimately, failed logons. While it would not be an immediate issue to take this server offline (provided you do not have any legacy applications), this would be the role I would be most concerned about in the event of a DC failure.

Conclusion

If you are still reading, well done! This article covers several aspects of Active Directory in detail, including low-level database processes unseen at the surface - particularly via the GUI. However, FSMO roles are a crucial component of your deployment -- having an understanding of the underpinning concepts will help with their placement, deployment and high availability concerns within your enterprise.

10 Tips to Optimize Exchange 2003 Performance (Part

Introduction

Remember performance optimizer from Exchange 5.5 days? At the end of every Exchange installation you were prompted to run the optimizer that would configure some settings, based on the hardware, workload and specific use, contributing to the overall stability and performance of the server.
The 15 minutes of fame of this fine tool ended with the release of Exchange 2000, since that version was supposed to be self-tuning. But soon people discovered that there was still room for improvements, because tuning is such a complex process, so it was only natural that tech gurus and Microsoft itself started doing some recommendations.
When Exchange 2003 saw the daylight, some old Exchange 2000 recommendations turned obsolete, but new ones replaced them and some were adapted to cope with the then new Windows Server 2003.
There are some obvious things that you can do to improve performance, such as buying new processors (and use hyper-threading), adding more memory, and migrating to a faster storage system. You won’t see hardware related tips on the list I’m about to give you, but it’s always a best practice to monitor server performance with Windows Performance Monitor, in order to detect physical bottlenecks.
The following recommendations apply to Exchange Server 2003 installed on Windows Server 2003, because probably that’s the most common scenario nowadays. And Exchange Server 2003 combined with Windows Server 2003 make a perfect couple. When I started writing these lines, I even thought to recommend the use of Windows 2003 as my first tip, because it adds some enhancements and functionality to an Exchange 2003 infrastructure. You’ll only get the full user experience of Exchange 2003 if you use Windows 2003 (it’s the recommended OS by Microsoft, check http://www.microsoft.com/technet/prodtechnol/exchange/2003/bestconfig.mspx). So, now that it’s said, you can make that tip number 0.
You should also have present that, although these are general recommendations, depending on your Exchange implementation you may have to do some adjustments. That would be the case if you have a large implementation of Outlook Web Access (OWA), Outlook Mobile Access (OMA), ActiveSync or RPC over HTTP.

1.        Document yourself

Let’s face it, a knowledgeable IT staff makes a better Exchange environment. Although I’ll try to give you some clues on how to improve Exchange performance, there’s no way I could cover all possible scenarios of a complex infrastructure as any e-mail system can be.
There’s lots of information about Exchange on the Internet. There’s a whole community willing to help you with your most difficult tasks. I’m never tired of saying what a great job the Microsoft Exchange Team has done on documenting the product. I strongly advise you to visit Exchange Server 2003 Technical Documentation Library (http://www.microsoft.com/technet/prodtechnol/exchange/2003/library/default.mspx) on a regular basis. And you’re always welcome on the Exchange Server Community (http://www.microsoft.com/exchange/community/default.mspx), where you can find lots of technical resources, related external sites, check out the latest webcasts or even discover the many blogs that exist and give you valuable information.

2.        Remove obsolete Exchange 2000 tuning parameters

You document every change you do on your production servers, right? No? Oh, oh… Now it’s the time to remove deprecated Exchange 2000 tuning parameters.
It’s a fact that some Microsoft recommendations change over time, either because they modify the software by launching service packs or new releases, or just because they come to a conclusion that their previous recommendation was wrong (or less right). Some tuning parameters for Exchange 2000 or Windows 2000 are no longer valid for the new 2003 versions, so make sure you undo those modifications.
You can find detailed information about the settings that must be removed, in "Removing Exchange 2000 Tuning Parameters" from the Exchange Server 2003 Deployment Guide (http://go.microsoft.com/fwlink/?LinkId=21768).

3.        Optimize Exchange memory utilization

You know Exchange loves memory. The store.exe process is mainly responsible for this behaviour, since it will grab as much memory as it can possibly get. This doesn’t represent any kind of problem or a memory leak, but actually it’s a normal and expected operation.
What you should also know is that if you have more than 1GB of RAM you can make Exchange’s use of memory more efficient. Yeah, that’s right, the famous /3GB switch. But this switch is not a one-size-fits-all. You should be aware that this setting is not recommended on front-end servers, dedicated bridgeheads or when you have Exchange installed on a Domain Controller (which is, by the way, not recommended).
  • Add the switches /3GB and /USERVA=3030 to boot.ini. The /3GB switch modifies the way virtual address space is created so that 3 gigabytes are available for user mode applications;
  • Configure the HKLM\SYSTEM\CurrentControlSet\Control\Session Manager\HeapDeCommitFreeBlockThreshold registry value to 0x00040000. The HeapDecommitFreeBlockThreshold registry key specifies the number of contiguous bytes above which the memory is decomitted rather than retained for reuse, thus avoiding virtual memory fragmentation.
  • Verify that the HKLM\SYSTEM\CurrentControlSet\Control\Session Manager\Memory Management\SystemPages registry value is set to 0.
  • If you have a server with more than 2 GB of memory, it may help to increase the size of the Store Database Cache (aka ESE buffer).

Figure 1: Windows virtual address space

4.        Implement an effective storage design

Storage design is very important, because disk subsystem bottlenecks cause more performance problems than processor or memory deficiencies. The most common error people do when planning an Exchange server is that they tend to design for capacity and not for performance.
Many of us know that we should use separate disk volumes for the OS, Exchange logs and Exchange store(s), with the following RAID levels:
OS: RAID 1
Logs: RAID 1
Database: RAID 0+1
But the thing most people forget is IOPS (I/O per second), which is the measure of throughput you should use. To implement an effective storage design you must calculate the necessary IOPS for your system.
The theoretical calculations require you should know in advance some numbers, such as user behaviour and disk specifications.
One can assume that an average user requires 0.5 IOPS or, being a little more aggressive, 0.75 IOPS. If you don’t want to estimate anything and you already have a live system, you can measure your true needs. There’s a good document, “Optimizing Storage For Exchange Server 2003” (http://www.microsoft.com/technet/prodtechnol/exchange/2003/library/optimizestorage.mspx) that has detailed instructions on how to do that.
Next, for our calculations, we need to know the average performance of the disks. Typically a 10K RPM disk will do 130 IOPS, and a 15K RPM will achieve 180 IOPS.
Since we’re using RAID, there’s a penalty that depends on the RAID level. Assuming there are 3 reads for every write, the penalty factor for RAID 5 is 0.57 and 0.8 for RAID 1 (or 0+1).
Finally, here’s the formula we’ll use:
Total IOPS = #Disks x IOPS/Disk x RAID Penalty factor
So, for example, if you want to know how many 15K RPM disks you’ll need for 1000 users, assuming 0.5 IOPS/user and RAID 0+1:
0.5 x 1000 = #Disks x 180 x .8 <-> #Disks = 500 /(180 x .8) = 3.47
We must round up the result to the next even number (RAID 0+1 requires an even number of disks), which is 4. That’s how many disks we’ll need.
Although this entire math is true for every Exchange disk, this is particularly critical for database drives, since 90% of the IO on the system goes to the databases and only 10% goes to the logs.
The next thing we can do to improve storage performance is to work on disk geometry. Microsoft provides a tool, Diskpar, which allows aligning the disk tracks with sector tracks. For partitions created by Windows 2000 and Windows Server 2003, the default starting sector for disks that have more than 63 sectors per track is the 64th sector, causing one out of every eight blocks of data written to your disk to span two disk tracks. Diskpar can increase disk performance as much as 20 percent, but you should always consult your hardware vendor before using this tool. Some disk configurations will have no benefit from the tool.
The Diskpar utility can be found in the Windows 2000 Server Resource Kit. With the release of Windows Server 2003 SP1, diskpart will include this functionality, with the new switch /align.
To resume:
  • Keep Exchange transaction logs and databases stored on separate disk volumes to provide both data protection and efficiency (separation of sequential writes and random read/write access, respectively);
  • Calculate the number of spindles needed to provide the necessary IOPS;
  • Use Diskpar if your hardware vendor recommends it;
  • If your RAID controller has a mirrored, battery-backed, write-back cache, set the ratio to 100 percent write. Also configure the page size to be 4 KB.
  • When you format the hard disks stay away from quick format. Configure the partition to use NTFS and to use an allocation unit size of 4096 (4 KB).
It’s impossible to cover all issues regarding the storage subsystem, so I strongly recommend further reading:
“Optimizing Storage for Exchange Server 2003”,
http://www.microsoft.com/technet/prodtechnol/exchange/2003/library/optimizestorage.mspx
“A few basic concepts in disk sizing”,
http://blogs.msdn.com/exchange/archive/2004/10/11/240868.aspx
“Some more thoughts on disk IO and calculations…”,
http://blogs.msdn.com/evand/archive/2004/10/14/242127.aspx

5.        Ensure that you have fast access to AD

When planning your Exchange deployment, it is crucial that you consider your Windows Server network topology, because Exchange requires Active Directory to store configuration settings and also to provide user authentication, permissions management and directory information.
From every kind of AD server, one has a particular relevance: the global catalog. A global catalog is required in each domain that contains Exchange servers. As a rule of thumb, one might say that every mailbox server needs a global catalog by its side, since, as I said before, this particular server is critical for some Exchange services (including log on, group membership, store services) and access to the global address list (GAL).
Consider the following when placing global catalog servers:
  • All Exchange servers and users should have fast access to a global catalog server. Address lookups will become much faster if you contact a local global catalog, as opposed to a remote one which, besides increasing network traffic, will also impair the user experience. Verify that the DSAccess list only contains local DC/GC servers.
  • There should generally be a 4:1 ratio of Exchange processors to global catalog server processors, assuming the processors are similar models and speeds. However, depending on your situation, higher global catalog server usage, a large Active Directory, or large distribution lists can necessitate more global catalog servers.
  • In addition, using multiple domain controllers within domains distributes the lookup traffic and provides redundancy if a domain controller fails.
  • Use the/3GB switch on global catalogs. It will increase the JET cache from 512MB to 1GB, so you’ll have more AD objects in memory.

Summary

These are the first 5 tips out of 10 I will cover and that will, hopefully, help you optimize your Exchange environment. You should keep in mind that performance optimization is not only about identifying bottlenecks and taking the appropriate measures to correct them, but it also has a lot to do with proactively preventing configuration problems before they arise.
What I’m trying to say is that, better than applying blindly the tips I’m giving you, you should take the time to understand all the variables that affect your system, including user profile, business needs, architecture and hardware.
Read the next 5 tips at 10 Tips to Optimize Exchange 2003 Performance (Part 2)

Tuesday, August 3, 2010

Exchange Error Topology

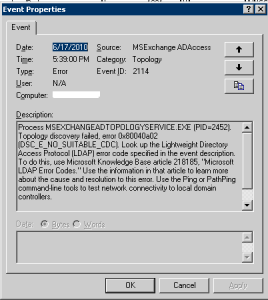
Exchange 07: Topology discovery failed, error 0x80040a02 (DSC_E_NO_SUITABLE_CDC)

Hello World,
Today, I want to blog about a small issue I’ve encounter during the setup of an Exchange 2007 SP2 server.  In this project, the Exchange infrastructure was centrally managed and the local site (where i was working) would have the necessary rights to perform the installation and management of the Exchange Server.
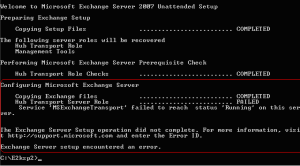
After checking that the Exchange server was provisioned correctly, I decided to start the setup routine from a command line.  After some times, I’ve received this kind of error(see screenshot below) :
The Service MSExchangeTransport failed to reach status “Running” on this server.
If you look in the Event viewer, you will might see an event error id 2214 and a message similar to the following screen
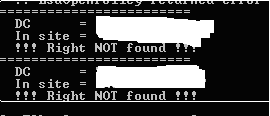
I’ve googled a little bit and found this link.  The workaround proposed was to add the Exchange Server to the Domain admins group. This was not an option for me because the Infrastructure was centrally managed and that was not allowed (for security reasons) to add the computer account to this group. I thought that maybe some rights were missing. So, i decided to use the policytest.exe tool to validate the configuration of the Exchange infrastructure. This utility is included in the Exchange installation CD and can verify if the Manage auditing and Security Log rights has been granted to your Exchange Server (through the Default Domain Controller Policy) .
The result of the policytest.exe tool clearly returned that the Exchange server was not having all the necessary rights needed to perform the installation.
Obviously, something was missing. It turns out that indeed the Exchange Server group didn’t have (anymore) the SeSecurityPrivilege right.  We fixed the problem by updating the Default Domain controller policy and granting the Exchange Servers group the Manage auditing and Security log right. We checked also that the Exchange Server was a member of the Exchange Servers Group.  After granting this right to the server, everything was working as expected.
This link provide as workaround the addition of the exchange Computer account to the Domain Admins Group.  This workaround is working probably because by default the only group having the SeSecurityPrivilege is the Built-in Administrators group.  Domain Admins groups are normally also member of the Administrators group.  So, If you encountered or have encounter the issue, you might want to check the rights and remove the Exchange server account from the Domain Admins Group.
Note 1 :  Running the /prepareDomain switch during your Exchange 2007 Setup should update the Default Domain Controller Policy and grant the necessary rights the The Exchange servers Groups
Note 2 :  Some people have reported a similar error that might have been caused by the removal of the IPv6 protocol.  See here (even if the article is targeted to SBS).  If you encounter a similar error message and you have remove the IPv6 stack, you have 2 options re-enable the IPv6 stack or use a specific procedure to remove the IPv6 from your Windows 2008 Server

Monday, August 2, 2010

Seizing FSMO Roles

How can I forcibly transfer (seize) some or all of the FSMO Roles from one DC to another?

Windows 2000/2003 Active Directory domains utilize a Single Operation Master method called FSMO (Flexible Single Master Operation), as described in Understanding FSMO Roles in Active Directory.
The five FSMO roles are:
  • Schema master - Forest-wide and one per forest.
  • Domain naming master - Forest-wide and one per forest.
  • RID master - Domain-specific and one for each domain.
  • PDC - PDC Emulator is domain-specific and one for each domain.
  • Infrastructure master - Domain-specific and one for each domain.
In most cases an administrator can keep the FSMO role holders (all 5 of them) in the same spot (or actually, on the same DC) as has been configured by the Active Directory installation process. However, there are scenarios where an administrator would want to move one or more of the FSMO roles from the default holder DC to a different DC.
Moving the FSMO roles while both the original FSMO role holder and the future FSMO role holder are online and operational is called Transferring, and is described in the Transferring FSMO Roles article.
However, when the original FSMO role holder went offline or became non operational for a long period of time, the administrator might consider moving the FSMO role from the original, non-operational holder, to a different DC. The process of moving the FSMO role from a non-operational role holder to a different DC is called Seizing, and is described in this article.
If a DC holding a FSMO role fails, the best thing to do is to try and get the server online again. Since none of the FSMO roles are immediately critical (well, almost none, the loss of the PDC Emulator FSMO role might become a problem unless you fix it in a reasonable amount of time), so it is not a problem to them to be unavailable for hours or even days.
If a DC becomes unreliable, try to get it back on line, and transfer the FSMO roles to a reliable computer. Administrators should use extreme caution in seizing FSMO roles. This operation, in most cases, should be performed only if the original FSMO role owner will not be brought back into the environment. Only seize a FSMO role if absolutely necessary when the original role holder is not connected to the network.
What will happen if you do not perform the seize in time? This table has the info:
FSMO RoleLoss implications
SchemaThe schema cannot be extended. However, in the short term no one will notice a missing Schema Master unless you plan a schema upgrade during that time.
Domain NamingUnless you are going to run DCPROMO, then you will not miss this FSMO role.
RIDChances are good that the existing DCs will have enough unused RIDs to last some time, unless you're building hundreds of users or computer object per week.
PDC EmulatorWill be missed soon. NT 4.0 BDCs will not be able to replicate, there will be no time synchronization in the domain, you will probably not be able to change or troubleshoot group policies and password changes will become a problem.
InfrastructureGroup memberships may be incomplete. If you only have one domain, then there will be no impact.
Important: If the RID, Schema, or Domain Naming FSMOs are seized, then the original domain controller must not be activated in the forest again. It is necessary to reinstall Windows if these servers are to be used again.
The following table summarizes the FSMO seizing restrictions:
FSMO RoleRestrictions
SchemaOriginal must be reinstalled
Domain Naming
RID
PDC EmulatorCan transfer back to original
Infrastructure
Another consideration before performing the seize operation is the administrator's group membership, as this table lists:
FSMO RoleAdministrator must be a member of
SchemaSchema Admins
Domain NamingEnterprise Admins
RIDDomain Admins
PDC Emulator
Infrastructure
To seize the FSMO roles by using Ntdsutil, follow these steps:
Caution: Using the Ntdsutil utility incorrectly may result in partial or complete loss of Active Directory functionality.
  1. On any domain controller, click Start, click Run, type Ntdsutil in the Open box, and then click OK.
Microsoft Windows [Version 5.2.3790]
(C) Copyright 1985-2003 Microsoft Corp.

C:\WINDOWS>ntdsutil
ntdsutil:
  1. Type roles, and then press ENTER.
ntdsutil: roles
fsmo maintenance:
Note: To see a list of available commands at any of the prompts in the Ntdsutil tool, type ?, and then press ENTER.
  1. Type connections, and then press ENTER.
fsmo maintenance: connections
server connections:
  1. Type connect to server , where  is the name of the server you want to use, and then press ENTER.
server connections: connect to server server100
Binding to server100 ...
Connected to server100 using credentials of locally logged on user.
server connections:
  1. At the server connections: prompt, type q, and then press ENTER again.
server connections: q
fsmo maintenance:
  1. Type seize , where  is the role you want to seize. For example, to seize the RID Master role, you would type seize rid master:
Options are:
Seize domain naming master
Seize infrastructure master
Seize PDC
Seize RID master
Seize schema master
  1. You will receive a warning window asking if you want to perform the seize. Click on Yes.
fsmo maintenance: Seize infrastructure master
Attempting safe transfer of infrastructure FSMO before seizure.
ldap_modify_sW error 0x34(52 (Unavailable).
Ldap extended error message is 000020AF: SvcErr: DSID-03210300, problem 5002 (UNAVAILABLE)
, data 1722

Win32 error returned is 0x20af(The requested FSMO operation failed. The current FSMO holde
r could not be contacted.)
)
Depending on the error code this may indicate a connection,
ldap, or role transfer error.
Transfer of infrastructure FSMO failed, proceeding with seizure ...
Server "server100" knows about 5 roles
Schema - CN=NTDS Settings,CN=SERVER200,CN=Servers,CN=Default-First-Site-Name,CN=Sites,CN=Configuration,DC=dpetri,DC=net
Domain - CN=NTDS Settings,CN=SERVER100,CN=Servers,CN=Default-First-Site-Name,CN=Sites,CN=Configuration,DC=dpetri,DC=net
PDC - CN=NTDS Settings,CN=SERVER100,CN=Servers,CN=Default-First-Site-Name,CN=Sites,CN=Configuration,DC=dpetri,DC=net
RID - CN=NTDS Settings,CN=SERVER200,CN=Servers,CN=Default-First-Site-Name,CN=Sites,CN=Configuration,DC=dpetri,DC=net
Infrastructure - CN=NTDS Settings,CN=SERVER100,CN=Servers,CN=Default-First-Site-Name,CN=Sites,CN=Configuration,DC=dpetri,DC=net
fsmo maintenance:
Note: All five roles need to be in the forest. If the first domain controller is out of the forest then seize all roles. Determine which roles are to be on which remaining domain controllers so that all five roles are not on only one server.
  1. Repeat steps 6 and 7 until you've seized all the required FSMO roles.
  2. After you seize or transfer the roles, type q, and then press ENTER until you quit the Ntdsutil tool.
Note: Do not put the Infrastructure Master (IM) role on the same domain controller as the Global Catalog server. If the Infrastructure Master runs on a GC server it will stop updating object information because it does not contain any references to objects that it does not hold. This is because a GC server holds a partial replica of every object in the forest.

Transferring FSMO Roles

How can I transfer some or all of the FSMO Roles from one DC to another?

Windows 2000/2003 Active Directory domains utilize a Single Operation Master method called FSMO (Flexible Single Master Operation), as described in Understanding FSMO Roles in Active Directory.
In most cases an administrator can keep the FSMO role holders (all 5 of them) in the same spot (or actually, on the same DC) as has been configured by the Active Directory installation process. However, there are scenarios where an administrator would want to move one or more of the FSMO roles from the default holder DC to a different DC.
Moving the FSMO roles while both the original FSMO role holder and the future FSMO role holder are online and operational is called Transferring, and is described in this article.
The transfer of an FSMO role is the suggested form of moving a FSMO role between domain controllers and can be initiated by the administrator or by demoting a domain controller. However, the transfer process is not initiated automatically by the operating system, for example a server in a shut-down state. FSMO roles are not automatically relocated during the shutdown process - this must be considered when shutting down a domain controller that has an FSMO role for maintenance, for example.
In a graceful transfer of an FSMO role between two domain controllers, a synchronization of the data that is maintained by the FSMO role owner to the server receiving the FSMO role is performed prior to transferring the role to ensure that any changes have been recorded before the role change.
However, when the original FSMO role holder went offline or became non operational for a long period of time, the administrator might consider moving the FSMO role from the original, non-operational holder, to a different DC. The process of moving the FSMO role from a non-operational role holder to a different DC is called Seizing, and is described in the Seizing FSMO Roles article.
You can transfer FSMO roles by using the Ntdsutil.exe command-line utility or by using an MMC snap-in tool. Depending on the FSMO role that you want to transfer, you can use one of the following three MMC snap-in tools:
  • Active Directory Schema snap-in
  • Active Directory Domains and Trusts snap-in
  • Active Directory Users and Computers snap-in
To transfer the FSMO role the administrator must be a member of the following group:
FSMO RoleAdministrator must be a member of
SchemaSchema Admins
Domain NamingEnterprise Admins
RIDDomain Admins
PDC Emulator
Infrastructure
Transferring the RID Master, PDC Emulator, and Infrastructure Masters via GUI
To Transfer the Domain-Specific RID Master, PDC Emulator, and Infrastructure Master FSMO Roles:
  1. Open the Active Directory Users and Computers snap-in from the Administrative Tools folder.
  2. If you are NOT logged onto the target domain controller, in the snap-in, right-click the icon next to Active Directory Users and Computers and press Connect to Domain Controller.
  3. Select the domain controller that will be the new role holder, the target, and press OK.
  4. Right-click the Active Directory Users and Computers icon again and press Operation Masters.
  5. Select the appropriate tab for the role you wish to transfer and press the Change button.
  6. Press OK to confirm the change.
  7. Press OK all the way out.
Transferring the Domain Naming Master via GUI
To Transfer the Domain Naming Master Role:
  1. Open the Active Directory Domains and Trusts snap-in from the Administrative Tools folder.
  2. If you are NOT logged onto the target domain controller, in the snap-in, right-click the icon next to Active Directory Domains and Trusts and press Connect to Domain Controller.
  3. Select the domain controller that will be the new role holder and press OK.
  4. Right-click the Active Directory Domains and Trusts icon again and press Operation Masters.
  5. Press the Change button.
  6. Press OK to confirm the change.
  7. Press OK all the way out.
Transferring the Schema Master via GUI
To Transfer the Schema Master Role:
  1. Register the Schmmgmt.dll library by pressing Start > RUN and typing:
regsvr32 schmmgmt.dll
  1. Press OK. You should receive a success confirmation.
  2. From the Run command open an MMC Console by typing MMC.
  3. On the Console menu, press Add/Remove Snap-in.
  4. Press Add. Select Active Directory Schema.
  5. Press Add and press Close. Press OK.
  6. If you are NOT logged onto the target domain controller, in the snap-in, right-click the Active Directory Schema icon in the Console Root and press Change Domain Controller.
  7. Press Specify .... and type the name of the new role holder. Press OK.
  8. Right-click right-click the Active Directory Schema icon again and press Operation Masters.
  9. Press the Change button.
  10. Press OK all the way out.
Transferring the FSMO Roles via Ntdsutil
To transfer the FSMO roles from the Ntdsutil command:
Caution: Using the Ntdsutil utility incorrectly may result in partial or complete loss of Active Directory functionality.
  1. On any domain controller, click Start, click Run, type Ntdsutil in the Open box, and then click OK.
Microsoft Windows [Version 5.2.3790]
(C) Copyright 1985-2003 Microsoft Corp.

C:\WINDOWS>ntdsutil
ntdsutil:
  1. Type roles, and then press ENTER.
ntdsutil: roles
fsmo maintenance:
Note: To see a list of available commands at any of the prompts in the Ntdsutil tool, type ?, and then press ENTER.
  1. Type connections, and then press ENTER.
fsmo maintenance: connections
server connections:
  1. Type connect to server , where  is the name of the server you want to use, and then press ENTER.
server connections: connect to server server100
Binding to server100 ...
Connected to server100 using credentials of locally logged on user.
server connections:
  1. At the server connections: prompt, type q, and then press ENTER again.
server connections: q
fsmo maintenance:
  1. Type transfer . where  is the role you want to transfer.
For example, to transfer the RID Master role, you would type transfer rid master:
Options are:
Transfer domain naming master
Transfer infrastructure master
Transfer PDC
Transfer RID master
Transfer schema master
  1. You will receive a warning window asking if you want to perform the transfer. Click on Yes.
  2. After you transfer the roles, type q and press ENTER until you quit Ntdsutil.exe.
  3. Restart the server and make sure you update your backup.

Understanding FSMO Roles in Active Directory

What are the FSMO Roles in Active Directory?

Windows 2000/2003 Multi-Master Model

A multi-master enabled database, such as the Active Directory, provides the flexibility of allowing changes to occur at any DC in the enterprise, but it also introduces the possibility of conflicts that can potentially lead to problems once the data is replicated to the rest of the enterprise. One way Windows 2000/2003 deals with conflicting updates is by having a conflict resolution algorithm handle discrepancies in values by resolving to the DC to which changes were written last (that is, "the last writer wins"), while discarding the changes in all other DCs. Although this resolution method may be acceptable in some cases, there are times when conflicts are just too difficult to resolve using the "last writer wins" approach. In such cases, it is best to prevent the conflict from occurring rather than to try to resolve it after the fact.
For certain types of changes, Windows 2000/2003 incorporates methods to prevent conflicting Active Directory updates from occurring.

Windows 2000/2003 Single-Master Model

To prevent conflicting updates in Windows 2000/2003, the Active Directory performs updates to certain objects in a single-master fashion.
In a single-master model, only one DC in the entire directory is allowed to process updates. This is similar to the role given to a primary domain controller (PDC) in earlier versions of Windows (such as Microsoft Windows NT 4.0), in which the PDC is responsible for processing all updates in a given domain.
In a forest, there are five FSMO roles that are assigned to one or more domain controllers. The five FSMO roles are:
Schema Master:
The schema master domain controller controls all updates and modifications to the schema. Once the Schema update is complete, it is replicated from the schema master to all other DCs in the directory. To update the schema of a forest, you must have access to the schema master. There can be only one schema master in the whole forest.
Domain naming master:
The domain naming master domain controller controls the addition or removal of domains in the forest. This DC is the only one that can add or remove a domain from the directory. It can also add or remove cross references to domains in external directories. There can be only one domain naming master in the whole forest.
Infrastructure Master:
When an object in one domain is referenced by another object in another domain, it represents the reference by the GUID, the SID (for references to security principals), and the DN of the object being referenced. The infrastructure FSMO role holder is the DC responsible for updating an object's SID and distinguished name in a cross-domain object reference. At any one time, there can be only one domain controller acting as the infrastructure master in each domain.
Note: The Infrastructure Master (IM) role should be held by a domain controller that is not a Global Catalog server (GC). If the Infrastructure Master runs on a Global Catalog server it will stop updating object information because it does not contain any references to objects that it does not hold. This is because a Global Catalog server holds a partial replica of every object in the forest. As a result, cross-domain object references in that domain will not be updated and a warning to that effect will be logged on that DC's event log. If all the domain controllers in a domain also host the global catalog, all the domain controllers have the current data, and it is not important which domain controller holds the infrastructure master role.
Relative ID (RID) Master:
The RID master is responsible for processing RID pool requests from all domain controllers in a particular domain. When a DC creates a security principal object such as a user or group, it attaches a unique Security ID (SID) to the object. This SID consists of a domain SID (the same for all SIDs created in a domain), and a relative ID (RID) that is unique for each security principal SID created in a domain.  Each DC in a domain is allocated a pool of RIDs that it is allowed to assign to the security principals it creates. When a DC's allocated RID pool falls below a threshold, that DC issues a request for additional RIDs to the domain's RID master. The domain RID master responds to the request by retrieving RIDs from the domain's unallocated RID pool and assigns them to the pool of the requesting DC. At any one time, there can be only one domain controller acting as the RID master in the domain.
PDC Emulator:
The PDC emulator is necessary to synchronize time in an enterprise. Windows 2000/2003 includes the W32Time (Windows Time) time service that is required by the Kerberos authentication protocol. All Windows 2000/2003-based computers within an enterprise use a common time. The purpose of the time service is to ensure that the Windows Time service uses a hierarchical relationship that controls authority and does not permit loops to ensure appropriate common time usage.
The PDC emulator of a domain is authoritative for the domain. The PDC emulator at the root of the forest becomes authoritative for the enterprise, and should be configured to gather the time from an external source. All PDC FSMO role holders follow the hierarchy of domains in the selection of their in-bound time partner.
In a Windows 2000/2003 domain, the PDC emulator role holder retains the following functions:
  • Password changes performed by other DCs in the domain are replicated preferentially to the PDC emulator.
  • Authentication failures that occur at a given DC in a domain because of an incorrect password are forwarded to the PDC emulator before a bad password failure message is reported to the user.
  • Account lockout is processed on the PDC emulator.
  • Editing or creation of Group Policy Objects (GPO) is always done from the GPO copy found in the PDC Emulator's SYSVOL share, unless configured not to do so by the administrator.
  • The PDC emulator performs all of the functionality that a Microsoft Windows NT 4.0 Server-based PDC or earlier PDC performs for Windows NT 4.0-based or earlier clients.
This part of the PDC emulator role becomes unnecessary when all workstations, member servers, and domain controllers that are running Windows NT 4.0 or earlier are all upgraded to Windows 2000/2003. The PDC emulator still performs the other functions as described in a Windows 2000/2003 environment.
At any one time, there can be only one domain controller acting as the PDC emulator master in each domain in the forest.

Determining FSMO Role Holders

How can I determine who are the current FSMO Roles holders in my domain/forest?


Windows 2000/2003 Active Directory domains utilize a Single Operation Master method called FSMO (Flexible Single Master Operation), as described in Understanding FSMO Roles in Active Directory.
The five FSMO roles are:
  • Schema master - Forest-wide and one per forest.
  • Domain naming master - Forest-wide and one per forest.
  • RID master - Domain-specific and one for each domain.
  • PDC - PDC Emulator is domain-specific and one for each domain.
  • Infrastructure master - Domain-specific and one for each domain.
In most cases an administrator can keep the FSMO role holders (all 5 of them) in the same spot (or actually, on the same DC) as has been configured by the Active Directory installation process. However, there are scenarios where an administrator would want to move one or more of the FSMO roles from the default holder DC to a different DC. The transferring method is described in the Transferring FSMO Roles article, while seizing the roles from a non-operational DC to a different DC is described in the Seizing FSMO Roles article.
In order to better understand your AD infrastructure and to know the added value that each DC might possess, an AD administrator must have the exact knowledge of which one of the existing DCs is holding a FSMO role, and what role it holds. With that knowledge in hand, the administrator can make better arrangements in case of a scheduled shut-down of any given DC, and better prepare him or herself in case of a non-scheduled cease of operation from one of the DCs.
How to find out which DC is holding which FSMO role? Well, one can accomplish this task by many means. This article will list a few of the available methods.

Method #1: Know the default settings

The FSMO roles were assigned to one or more DCs during the DCPROMO process. The following table summarizes the FSMO default locations:
FSMO RoleNumber of DCs holding this roleOriginal DC holding the FSMO role
SchemaOne per forestThe first DC in the first domain in the forest (i.e. the Forest Root Domain)
Domain NamingOne per forest
RIDOne per domainThe first DC in a domain (any domain, including the Forest Root Domain, any Tree Root Domain, or any Child Domain)
PDC EmulatorOne per domain
InfrastructureOne per domain

Method #2: Use the GUI

The FSMO role holders can be easily found by use of some of the AD snap-ins. Use this table to see which tool can be used for what FSMO role:
FSMO RoleWhich snap-in should I use?
SchemaSchema snap-in
Domain NamingAD Domains and Trusts snap-in
RIDAD Users and Computers snap-in
PDC Emulator
Infrastructure
Finding the RID Master, PDC Emulator, and Infrastructure Masters via GUI
To find out who currently holds the Domain-Specific RID Master, PDC Emulator, and Infrastructure Master FSMO Roles:
  1. Open the Active Directory Users and Computers snap-in from the Administrative Tools folder.
  2. Right-click the Active Directory Users and Computers icon again and press Operation Masters.
  1. Select the appropriate tab for the role you wish to view.
  1. When you're done click Close.
Finding the Domain Naming Master via GUI
To find out who currently holds the Domain Naming Master Role:
  1. Open the Active Directory Domains and Trusts snap-in from the Administrative Tools folder.
  2. Right-click the Active Directory Domains and Trusts icon again and press Operation Masters.
  1. When you're done click Close.
Finding the Schema Master via GUI
To find out who currently holds the Schema Master Role:
  1. Register the Schmmgmt.dll library by pressing Start > RUN and typing:
regsvr32 schmmgmt.dll
  1. Press OK. You should receive a success confirmation.
  2. From the Run command open an MMC Console by typing MMC.
  3. On the Console menu, press Add/Remove Snap-in.
  4. Press Add. Select Active Directory Schema.
  5. Press Add and press Close. Press OK.
  6. Click the Active Directory Schema icon. After it loads right-click it and press Operation Masters.
  1. Press the Close button.

Method #3: Use the Ntdsutil command

C:\WINDOWS>ntdsutil
ntdsutil:
  1. Type roles, and then press ENTER.
ntdsutil: roles
fsmo maintenance:
Note: To see a list of available commands at any of the prompts in the Ntdsutil tool, type ?, and then press ENTER.
  1. Type connections, and then press ENTER.
fsmo maintenance: connections
server connections:
  1. Type connect to server , where is the name of the server you want to use, and then press ENTER.
server connections: connect to server server100
Binding to server100 ...
Connected to server100 using credentials of locally logged on user.
server connections:
  1. At the server connections: prompt, type q, and then press ENTER again.
server connections: q
fsmo maintenance:
  1. At the FSMO maintenance: prompt, type Select operation target, and then press ENTER again.
fsmo maintenance: Select operation target
select operation target:
  1. At the select operation target: prompt, type List roles for connected server, and then press ENTER again.
select operation target: List roles for connected server
Server "server100" knows about 5 roles
Schema - CN=NTDS Settings,CN=SERVER100,CN=Servers,CN=Default-First-Site-Name,CN=Sites,CN=C
onfiguration,DC=dpetri,DC=net
Domain - CN=NTDS Settings,CN=SERVER100,CN=Servers,CN=Default-First-Site-Name,CN=Sites,CN=C
onfiguration,DC=dpetri,DC=net
PDC - CN=NTDS Settings,CN=SERVER100,CN=Servers,CN=Default-First-Site-Name,CN=Sites,CN=Conf
iguration,DC=dpetri,DC=net
RID - CN=NTDS Settings,CN=SERVER100,CN=Servers,CN=Default-First-Site-Name,CN=Sites,CN=Conf
iguration,DC=dpetri,DC=net
Infrastructure - CN=NTDS Settings,CN=SERVER100,CN=Servers,CN=Default-First-Site-Name,CN=Si
tes,CN=Configuration,DC=dpetri,DC=net
select operation target:
  1. Type q 3 times to exit the Ntdsutil prompt.
Note: You can download THIS nice batch file that will do all this for you (1kb).
Another Note: Microsoft has a nice tool called Dumpfsmos.cmd, found in the Windows 2000 Resource Kit (and can be downloaded here: Download Free Windows 2000 Resource Kit Tools). This tool is basically a one-click Ntdsutil script that performs the same operation described above.

Method #4: Use the Netdom command

The FSMO role holders can be easily found by use of the Netdom command.
Netdom.exe is a part of the Windows 2000/XP/2003 Support Tools. You must either download it separately (from here Download Free Windows 2000 Resource Kit Tools) or by obtaining the correct Support Tools pack for your operating system. The Support Tools pack can be found in the \Support\Tools folder on your installation CD (or you can Download Windows 2000 SP4 Support ToolsDownload Windows XP SP1 Deploy Tools).
  1. On any domain controller, click Start, click Run, type CMD in the Open box, and then click OK.
  2. In the Command Prompt window, type netdom query /domain: fsmo (where is the name of YOUR domain).
C:\WINDOWS>netdom query /domain:dpetri fsmo
Schema owner server100.dpetri.net

Domain role owner server100.dpetri.net

PDC role server100.dpetri.net

RID pool manager server100.dpetri.net

Infrastructure owner server100.dpetri.net

The command completed successfully.
Close the CMD window.
Note: You can download THIS nice batch file that will do all this for you (1kb).

Method #5: Use the Replmon tool

The FSMO role holders can be easily found by use of the Netdom command.
Just like Netdom, Replmon.exe is a part of the Windows 2000/XP/2003 Support Tools. Replmon can be used for a wide verity of tasks, mostly with those that are related with AD replication. But Replmon can also provide valuable information about the AD, about any DC, and also about other objects and settings, such as GPOs and FSMO roles. Install the package before attempting to use the tool.
  1. On any domain controller, click Start, click Run, type REPLMON in the Open box, and then click OK.
  2. Right-click Monitored servers and select Add Monitored Server.
  1. In the Add Server to Monitor window, select the Search the Directory for the server to add. Make sure your AD domain name is listed in the drop-down list.
  1. In the site list select your site, expand it, and click to select the server you want to query. Click Finish.
  1. Right-click the server that is now listed in the left-pane, and select Properties.
  1. Click on the FSMO Roles tab and read the results.
  1. Click Ok when you're done.