Thursday, June 19, 2014

exchange 2013 Move-Mailbox issue - After a failed move request, the mailbox is still marked is being moved and cannot be removed again

Description

After a failed move request, sometimes (for unknown reason) the mailbox is still marked is being moved and cannot be removed again... the mailbox is shown with a green icon on the EMC (Exchange Management Console), however it cannot be seen on the "Move Request" section or with Get-MoveRequest command and cannot be cleared with the Remove-MoveRequest command.

In my example, the mailbox moved has failed due to too many bad items on the source mailbox (Fatal error TooManyBadItemsPermanentException has occurred) but I guess it could happen with some other errors too.

Solution

1. Open ADSIEDIT and navigate to the OU where your broken user account is stored. 
2. Locate the user account, right-click on it and then choose "Properties".
3. Click on the "Filter" button and make sure "Show only attributes that have values" is checked.
4. Scroll down the attributes and search for an entry called "msExchMailboxMoveRemoteHostName".
5. Click on the "Edit" button.
6. Click on the "Clear" button.
7. Click the "OK" button.

Affected software:

Microsoft Exchange 2010
Microsoft Exchange 2010 SP1
Office 365 RTM

Wednesday, June 11, 2014

Exchange Email Organization Report (Get-CorpEmailReport)

et-CorpEmailReport.ps1 V2.4.8  is an Email Organization Report and a great tool for IT Professionals who are working with Microsoft Exchange systems.
This report will get organization wide information about your Email infrastructure, from Exchange servers O.S info, service health, up time details, beside Exchange and database highly aggregated information.
Not only will you get a nice Dashboard describing your Exchange, you will get aggregated information about how much resources your email infrastructure is consuming in terms of server count, mailboxes and total storage.
Read more about script features, examples, and functionality on my blog : Ammar Hasayen Blog - Get-CorpEmailReport
Note: The script works on ALL VERSIONS OF Exchange Servers

Aggregated Data

The script will also present a nicely formatted tables with aggregated information like the mailboxes per type, Exchange servers per role and version, and also mailbox and archives count, sizes and average size.

Script Charts

What makes this script unique and outstanding, is the chart module. Nothing more exciting than parsing the output data in sorted nice looking charts.
Four charts will be generated after running the script. Each chart is designed carefully to get the information that matters most to IT Professional.
Chart Module uses a smart algorithm that will get information from your Exchange organization, digest it, and then decide what is the best way to output the chart depending on the number of data items. In this way, you will not get small crowded charts with hard to read data, instead, the graph dimensions will be scaled dynamically according to the number of items to draw.

Scope your script with three Filters [New]

The script ships with a new module to handle filtering and scoping your script. Sometimes, you want to get a report for certain DAGs only, so you can use the DAG filter.
Maybe you want to just get information from certain Exchange servers, so you can use the Server List filter and just write a comma separated list of servers.
Finally, you can use the Expression filter, where you can use the wildcard character (*) to write something like “NL*” to get information from server names started with NL.

DB Activation Preference Table [New]

Have you used the product team Exchange calculator where you input your data and a nice formatted table get generated for all your databases, and their copy distribution along with the activation preference?
The script is intelligent enough to collect your DAG information, database copy locations, their activation preference, and then generate a similar live dashboard with a colored cell indicating a red alarm if a database is mounted on a non-preferred mailbox server.

Detailed information for Servers and Databases

Of course the script will not be perfect if a detailed information is not presented. The script will start creating HTML tables for all your Exchange servers with all detailed information, including version, OS Info, Roll Up Updates version, Service health, Up Time information and more.
Also, for each database, you will get a detailed information about the database and all its properties with smart thresholds that you can customize.

Easy Script Code Browsing

The script code is divided to 7 modules to make it easy for you to dig deeply into the script code and reach the functionality you are looking for. The script also uses (Regions), so if you are using new PowerShell script editor, you will be able to expand each script region separately for better script browsing.

Logging and Error Handling

The script contains many new modules to handle exceptions and record the progress with timestamp for each action and output the results in one of three log files:
- Info Log
- Detailed Log
- Error Log

Other features

The script has Send Email feature, Error Logs and Info Logs, and it can be configured to get WMI data via PowerSehll Remoting. Visit my Blog Post for more information about how to run the script with full list of examples

Examples

.EXAMPLE
Generate the HTML report and supplying the current directry as a script path to create output files
.\Get-CorpEmailReport.ps1 -ScriptFilesPath .\
.EXAMPLE
Generate the HTML report and supplying the custom directory as a script path to create output files
.\Get-CorpEmailReport.ps1 -ScriptFilesPath C:\MyFiles
.EXAMPLE
Generate the HTML report and Filter by servers that start with “NL”
.\Get-CorpEmailReport.ps1 -ScriptFilesPath .\   -ServerFilter “NL*”
.EXAMPLE
Generate the HTML report and Filter by including only Ex1 and Ex2 servers
.\Get-CorpEmailReport.ps1 -ScriptFilesPath  .\  -OnlyIncludedServers  Ex1,Ex2
.EXAMPLE
Generate the HTML report and Filter by including only Servers that are member of a DAG called “DAG1″
.\Get-CorpEmailReport.ps1 -ScriptFilesPath .\  -InputDAGs  DAG1
.EXAMPLE
Generate the HTML report and use PowerShell Remoting for WMI data collection
\Get-CorpEmailReport.ps1 -ScriptFilesPath .\  -WMIRemoting
.EXAMPLE
Generate the HTML report with SMTP Email option
\Get-CorpEmailReport.ps1 -ScriptFilesPath .\  -SendMail:$true -MailFrom noreply@contoso.com-MailTo me@contoso.com -MailServer smtp.contoso.com
.EXAMPLE
Generate the HTML report with disabling ViewEntireForest option
\Get-CorpEmailReport.ps1 -ScriptFilesPath .\  -ViewEntireForest:$false

Script Read Me File

To get full information about the script, how it works and download the read me file, please visit my blog.

Copy Rights

The script code contains all copy rights and internal functions used from other authors.

Tuesday, June 10, 2014

Daily Mail Flow Summary Report

From - http://exchangeserverinfo.net/2013/03/daily-mail-flow-summary-report/

Hello All
Thanks to one of user on Microsoft Exchange 2010 forum who requested a way to generate details of emails processed by each HUB server deployed in environment, that I am getting chance to write & share this script with all.
Based on the request and some customization, this script generates email message statistics processed per HUB server in last 24 hours, generates output in HTML format, sends HTML email from output file. The statistics include:
  1. Total Message Count Processed
  2. Total Message Size in GB
  3. Average Message Size Processed MB
  4. Total Message Count from External Domains
  5. Total External Message size from External Domains in GB
  6. Average Message Size from External Domains in MB
  7. Total Message Count from Application Relay
  8. Total Message Size from Applications in GB
  9. Average Message Size from Applications in MB.
Based on your requirements, you can remove some of parameters or add more parameters to same script and generate appropriate output for your environment
How this script works: I will lay down some important points of script that you should be aware about:
  1. $fileName = “C:\Test\MessageSummaryReport.htm” – This is the name of HTML output file along with full local path on server.
  2. $startdate = $enddate.Add(-24).Date – This line defines to script that we’re looking for processing data in past 24 hours. If you want to process more data, you can change 24 accordingly, for example for processing 10 days worth of data, 24 will be replaced by 240 accordingly.
  3. $messages = Get-MessageTrackingLog -Server $serverName -start $startdate -end $enddate -ResultSize Unlimited | where-object {$_.EventID -eq ‘Receive’} – Core of script where it generates the required statistics from each server for data processing.
  4. $Externalmessages = $Messages | where-object {$_.EventID -eq ‘Receive’ -and $_.ClientHostName -like “*Edge*”} – Secondary line for filtering emails which are being sent via Exchange 2010 Edge servers. In our environment, edge server names have keyword “Edge” in them and hence that’s the filter I used. Based on your environment configuration, you can change the filter to use receive connector name or different keyword accordingly.
  5. $Relayedmessages = $Messages | where-object {$_.EventID -eq ‘Receive’ -and $_.ConnectorID -like “*Applications*”} – Same principle as above only this time we’re looking for traffic at receive connector level which has keywords “Applications” in its name. Based on your environment configuration, you can filter on another parameter or different keyword accordingly
  6. sendEmail Reporting@Contoso.com Administrator@contoso.com “Contoso Daily Mail Flow Summary” 10.0.0.1 $filename – This generates email to your needed recipients. The format of command is SendEmail <from address> <to address 1,<to address 2> “<Message Subject>” “<SMTP Server FQDN OR IP Address>” “<HTML file>”
Hope above script helps you monitor or report on your environment more closely and in automated fashion. Hence reducing your efforts and keeping Exchange environment healthy.
Please add any additional ideas to comment section.
Thank You !

How to Disable .PST Files in Outlook 2010 using Group Policy

If you're deploying Exchange 2010 then it's likely that you're also deploying archive mailboxes, and working to eliminate .PST files. Once you've put all the work in to migrate .PST files into Exchange, you obviously don't want users to continue working off of these local files. Let's take a look at how to use Group Policy to disable .PST files on our Outlook 2010 clients.
To test this out, I've got a small lab environment with a one 2008 R2 Domain Controller, an Exchange 2010 SP2 server, and a Windows 7 Machine running Outlook 2010. All of the configuration will take place in group policy, and we'll validate it on the Windows 7 machine. The Exchange server will be completely out of the picture here other than to provide a mailbox to open from the client.
The first thing we need to do is download the Office 2010 Administrative Template files (aka ADM templates) from the Microsoft download center. There's 32bit and 64bit versions available – download the appropriate file depending on which version of Office you have installed. In my case, I'm using the 32bit version of Office 2010. I am going to perform my group policy changes on the DC, so I'll download and extract AdminTemplates_32bit.exe on this server.
Copy outlk14.admx to the %systemroot%\PolicyDefinitions\ folder, and copy the associated outlk14.adml file from the admx\en-us folder to %systemroot%\PolicyDefinitions\en-us folder.
Start the Group Policy Management Console and open the GPO that will be applying the custom settings. In this example, I am going to use the Default Domain Policy. Right click and select 'Edit'
Drill down under User Configuration > Policies, and you should see the option to configure Microsoft Outlook 2010 settings. Keep navigating even further, underneath Microsoft Outlook 2010 > Outlook Options > Other > AutoArchive. You'll want to Enable the Disable File|Archive option, and Disable the AutoArchive Settings.
Next, navigate to Microsoft Outlook 2010 > Miscellaneous > PST Settings. Enable the "Prevent users from adding PSTs to Outlook profiles and/or prevent using Sharing-Exclusive PSTs" and set the option to "No PSTs can be added".
Also, enable "Prevent users from adding new content to existing PST files"
On the client machine, run a gpupdate /force to apply the GPO immediately and login. You'll notice the end-user now is blocked from performing PST related operations. For example, the "Open Outlook Data File" option is no longer visible when going to File > Open in Outlook 2010.
Additionally, attempting to import or export PST data results in the following message:
There you go – Outlook 2010 in full PST lockdown mode. Keep in mind that if you are using Outlook 2007, there are ADM templates for that as well. You just need to get the templates loaded into group policy and the configuration should basically be the same exact thing.

Monday, June 2, 2014

Exchange 2010/Outlook OWA – Find the client device IP Address!

Wondering where all those account lockouts came from? Oh you found it’s from the CAS!!! But what in CAS? CAS won’t lock a user unless there is a device involved… But there is no way to find that out. Think again – Yes, it is indeed possible.
ISSUE:
User id is getting lock the moment we unlock from AD. When you check the Security log you can only see the event with the exchange server and when you see IIS log you see F5 IP address but you can’t find real IP address of the client device.
Environment:
Windows 2008 R2 SP1
Exchange 2010 SP2 RU4
Exchange is CHM which is in CAS Array, Then F5 load balancer.
Different AD and Resource Forest Design
Solution:
Now in this kind of setup it is hard to get the IP of the client machine in Security event log so the option is IIS Advance Logging.
Below are the steps to enable Advance logging which will add the IP address of the Client device.
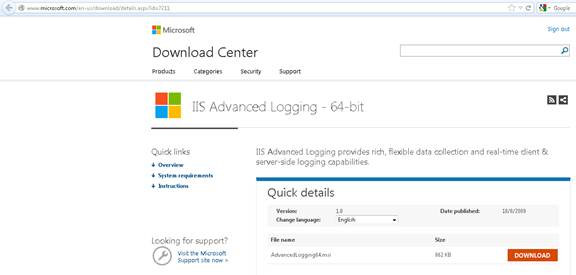
1. Install “Advanced Logging” on each CAS server:

Double click on msi file.
Check the accept checkbox and click, next, next and finish for the installation.
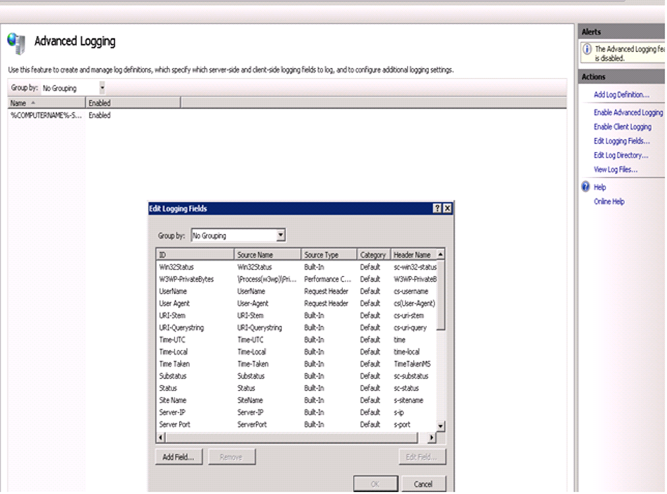
2. Add field “X-Forwarded-For” to the Advance Logging configuration:
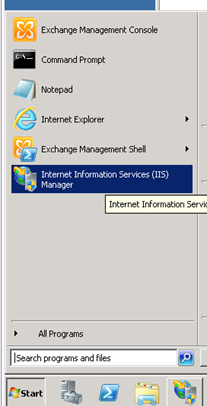
3. From your Windows Server 2008 or Windows Server 2008 R2 device, open the Internet Information Services (IIS) Manager.
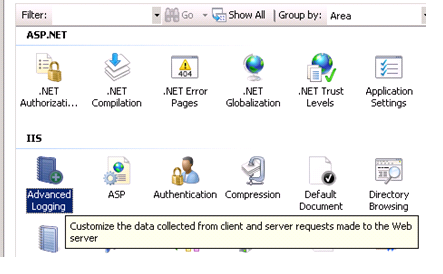
4. From the Connections navigation pane, click the appropriate CAS or CHM server on which you are configuring Advanced Logging. The Home page appears in the main panel. It will look like the below screenshot

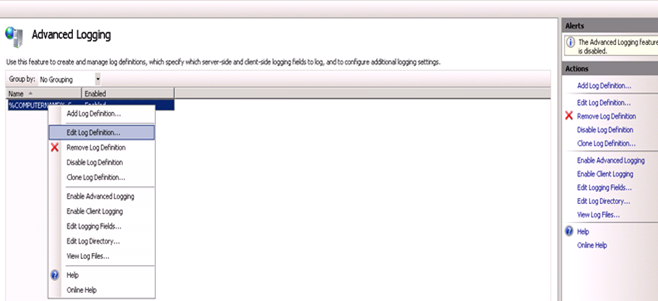
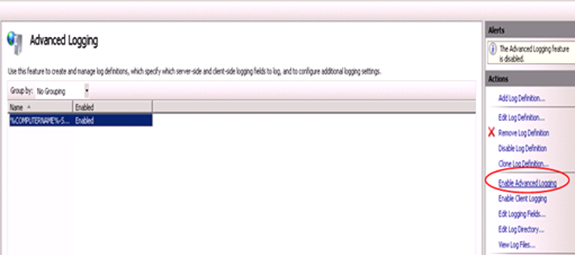
 5. From the Home page, under IIS, double-click Advanced Logging. It will look like the below screenshot
6. From the Actions pane on the right, click Edit Logging Fields.
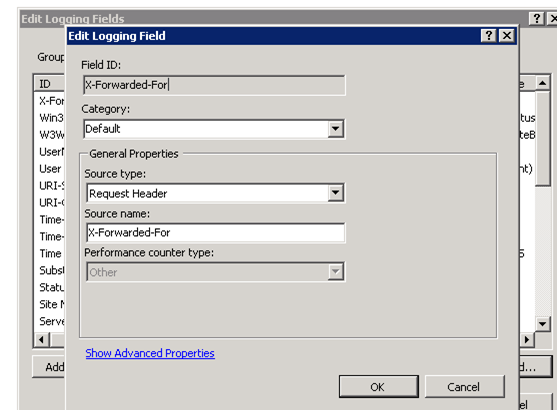
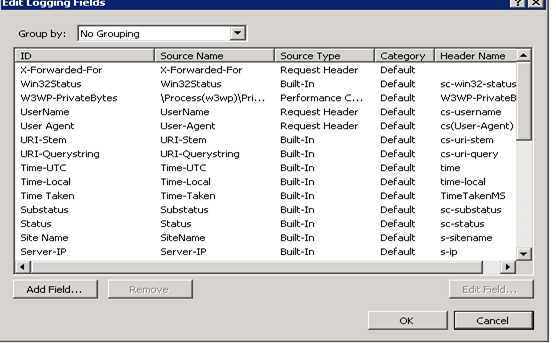
7. From the Edit Logging Fields dialog box, click the Add Field button, and then complete the following:
a. In the Field ID box, type X-Forwarded-For.
b. From the Category list, select Default.
c. From the Source Type list, select Request Header.
d. In the Source Name box, type X-Forwarded-For.
e. Click the OK button in the Add Logging Field box, and then click the OK button in the Edit Logging Fields box.
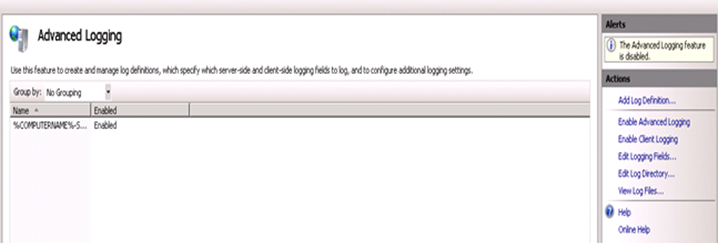
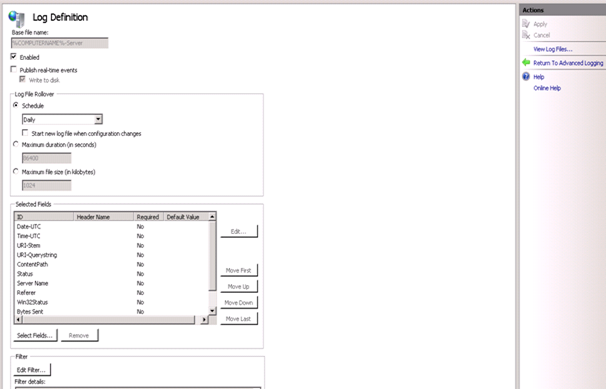
8. Click a Log Definition to select it. By default, there is only one: %COMPUTERNAME%-Server. The log definition you select must have a status of Enabled.
9. From the Actions pane on the right, click Edit Log Definition or right click and select Edit Log Definition.


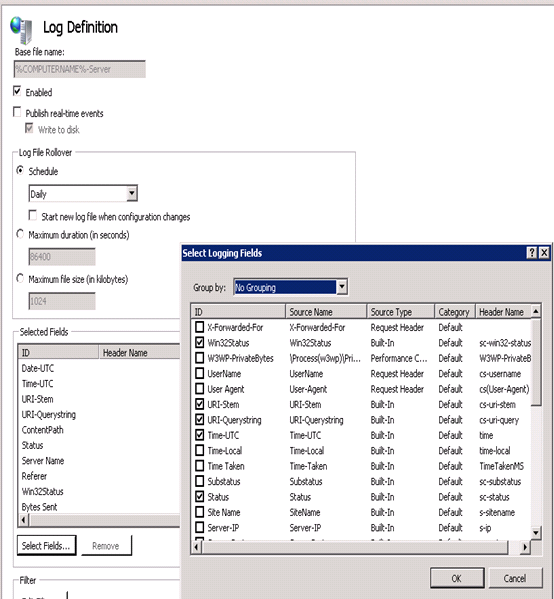
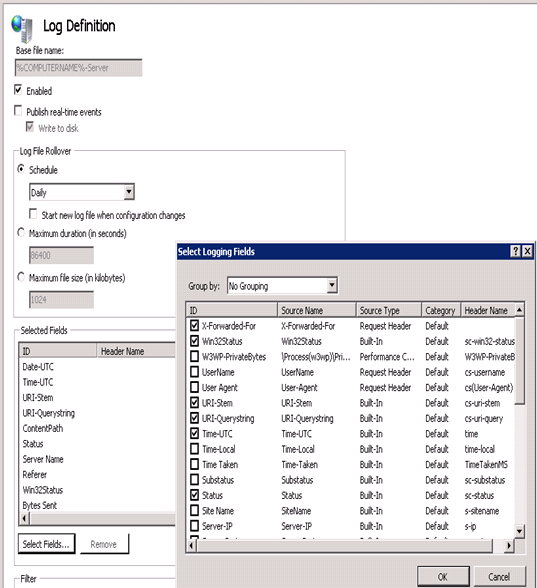
10. Click the Select Fields button, and then check the box for the X-Forwarded-For logging field.


11. Click the OK button.
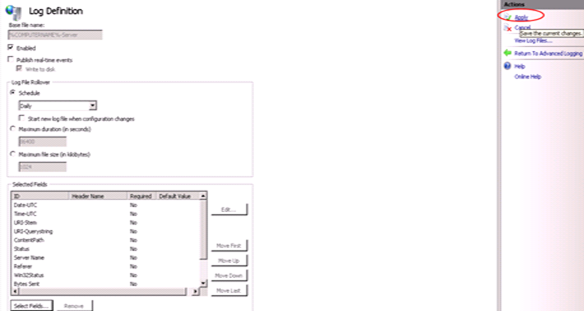
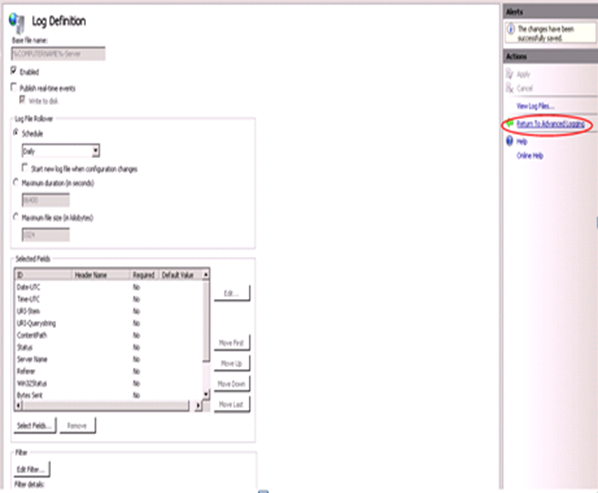
12. From the Actions pane, click Apply.
11. Click Return To Advanced Logging.
12. In the Actions pane, click Enable Advanced Logging.
13. Now, when you look at Inetpub\logs, you will see a new AdvancedLogs folder will be available with new logs and these logs will have the client device IP address.
Sample Log File
Prabhat Nigam (Wizkid)
Team@ MSExchangeGuru

Sunday, June 1, 2014

Exporting Lync Server 2010 Archive Database IM logs throws the error: “Export-CsArchivingData : A parameter cannot be found that matches parameter name 'Identity'.”

From - > http://terenceluk.blogspot.in/2013/03/exporting-lync-server-2010-archive.html


Another solution can be - Putting only Netbios name for the server - DBInstance switch

From - > http://social.technet.microsoft.com/Forums/lync/en-US/266a3ca1-b00a-4b8c-9548-e67ed0d4377f/archiving-database-issue

Problem
You attempt to export the IM logs from a Lync Server 2010 archive database with the cmdlet:
Export-CsArchivingData -Identity "ArchivingDatabase:svrsql200801.contoso.internal\lyncarc" -StartDate 1/1/2010 -OutputFolder "C:\ArchivingExports"
… but receive the following error:
PS C:\Users\tluk> Export-CsArchivingData -Identity "ArchivingDatabase:svrsql200801.contoso.internal\lyncarc" -StartDate 1/1/2010 -OutputFolder "C:\ArchivingExports"
Export-CsArchivingData : A parameter cannot be found that matches parameter name 'Identity'.
At line:1 char:33
+ Export-CsArchivingData -Identity <<<<  "ArchivingDatabase:svrsql200801.contoso.internal\lyncarc" -StartDate 1/1/2010 -OutputFolder "C:\ArchivingExports"
    + CategoryInfo          : InvalidArgument: (:) [Export-CsArchivingData], ParameterBindingException
    + FullyQualifiedErrorId : NamedParameterNotFound,ExportArchiveData.ExportArchiveDataCmdlet
PS C:\Users\tluk>
image
Solution
I was actually thrown off when I was asked to look into this because I don’t perform a lot of archiving database exports in a year but what ended up being the problem was that the administrator I was working with was using the Lync Server 2013 cmdlet switches to export a Lync Server 2010 archiving database and as some may know, the cmdlet is the same between the two versions but the switches have changed.  The following is the cmdlet and switches for Lync Server 2010:
image
… and the following is for Lync Server 2013:
image
The proper syntax for Lync Server 2010 is actually:
Export-CsArchivingData -DBInstance "svrsql200801.contoso.internal\lyncarc" -StartDate 1/1/2010 -OutputFolder "C:\ArchivingExports"
image
PS C:\Users\tluk> Export-CsArchivingData -DBInstance "svrsql200801.contoso.internal\lyncarc" -StartDate 1/1/2010 -OutputFolder "C:\ArchivingExports"
Total number of sessions: 10033  Successfully exported sessions: 10033 Failed sessions: 0
PS C:\Users\tluk>
This issue might seem a bit obvious but just in case someone comes across this error message and decides to Google it, this post should serve up a quick answer.